Pages

Thursday, March 21, 2013

Project Life: Week 11

Hi Everybody! Hope you are all having a wonderful week! I sure am :) Yesterday, I celebrated my birthday with the people I love most. It was a fabulous day! Nothing special or extravagant. Just a lovely, peaceful, quiet day at home with my family. I had a homecooked steak dinner, received a Birthday bouquet of my favorite flowers (Lilies), and enjoyed my favorite shows on the flat screen. I even managed to print up all of the pics I needed to finish Week 11 of Project Life.

Close-Up: Twilight Saga DVD Marathon. In honor of the release of BD2. 

But best of all... I was told by the Hubby, that today I can make a reservation for a (much needed & deserved, and slightly overdue) weekend family getaway. A certain place has been on my bucket list for a few years now...especially since we moved out here on this side of the water (making it only about a 3 hour drive from our house). We're so happy to finally take our first trip to La Push and Forks, WA! We'll be staying at an oceanfront resort on the Quileute Reservation in La Push. It's not a fancy "resort" though. Exact opposite actually. They provide no televisions or telephones in the units. You won't get cellular reception either. The only WiFi you'll find is at the resort office from 8am-8pm. Really, all you have to entertain yourself is mother nature. It's the rustic getaway we've been waiting for. The chance to get back to nature, to explore parts of Pacific NW we've never been, to make new family memories, and the opportunity to finally experience "Twilight Country." It's going to be amazing! And I'll be sharing this journey with you... planning, itinerary, packing (including my SMASH* bag), the days leading up to the trip, and everything in between. Stay tuned for Road Trip 2013: Forks, WA...

Sorry for the rambling...can you tell I'm super excited! We haven't gotten out of town for years... Now onto Project Life!

Life Documented
March 10 - 16
Project Life: Week 11

Lots of journaling this week. Starting with a lazy Sunday watching the complete Twilight Saga on DVD! The rest of the days I talked about food. Not sure why, it just worked out that way this week ;) We do love to eat! We had  a couple of our favorite foods: Filipino Adobo and NY Steaks. All the meat we purchase is 100% natural and local. So it made sense to write about the trip we took to our favorite local natural food market to pick up those key ingredients. 

Project Life: Week 11 - Left Page

The majority of this page uses free printables I've found on Pinterest. (See something you like? Check out my SMASH* & PL and/or Printables/Templates boards. Be sure to follow me...I find new stuff daily!) Most of the journal cards are from Miss Tiina's collections. I also used a couple of We R Memory Keepers journal cards and a card I cut on my Cameo. I added some fun square photos, a Twilight printable, and a piece of Twilight ephemera from a friend who also lives in Washington and visits Forks every year. (She found some cool handmade Twilight stamps there, including the vampire fangs you see!)

Project Life: Week 11 - Right Page

This page is all about food. We took a trip to our favorite local natural health food store. It's an amazing place! Kiani just loves it there. We even had lunch at the food court! I included photos of Central Market, a close-up of the fabulous NY steaks we purchased for dinner one night, as well as our stocked-up freezer (full of natural chicken, pork, and beef). Since we've made the switch to organic meats, we noticed immediately the huge difference in taste, and how well it cooks. Incredible! Organic and natural is definitely worth the price...

Are you documenting 2013 with Project Life? What do you like most about it? Any thoughts, questions, or comments about this post? Please let me know. Your feedback is always welcome and much appreciated!

Mahalo for stopping by!

Sunday, March 17, 2013

Green Clean: Dishwasher Detergent DIY


Ever since I tried my first homemade version of a green cleaner, I was hooked! I continued to expand my cleaning supply closet, replacing all of the chemical products with homemade essential green recipes, or store-bought green brands. Proud to say that 90% of my cleaning supplies are homemade! Happy about that.

I had great success making my own Concentrated Powdered Laundry Soap and absolutely love it! The next thing on my "To Make" list is Dishwasher Detergent. And I'm super excited about this recipe! The timing is perfect, as I just used our last dishwasher tab a couple days ago. I'm really glad that after first reading about this recipe a few months back, I started gathering the supplies for it. Now that it's time to make it, I already have everything I need!

I do a lot of research before trying out a new recipe. I like to gather as much useful information as possible before I make anything. I found three similar recipes for Dishwasher Detergent that each had tips and tidbits of info I found extremely helpful. These are things I wanted to be sure to include in my post that I thought everyone could benefit from.

Each recipe used the same basic, simple ingredients. I did some research into each of them -  how they work, what they do, where I can purchase them, alternatives to certain ingredients, etc.

Here's what I found:
  • Both Washing Soda and Borax fight grease and grime. Borax even removes hard water minerals and residues from the wash water; and it makes dishes sparkling clean. You can usually find Borax and Washing Soda right next to each other in the Laundry aisle.
  • LemiShine balances hard water and prevents a film residue from developing on your dishes, much like Borax. You can find it in the same place you find the dishwashing supplies. Citric Acid is the main ingredient in LemiShine and I read it's just as effective. It's an organic acid naturally found in many fruits, and acts as a natural preservative. You can find it in the baking aisle (near the canning supplies). With hard water, making adjustments to the amount of citric acid or LemiShine should help. 
  • Coarse Salt in this recipe is used for it's scrubbing power. It acts as an abrasive. Kosher salt or Epsom salt will work. One recipe I found even used regular table salt.


INGREDIENTS
  • 1 cup Borax
  • 1 cup Washing Soda
  • 1/2 cup Citric Acid (or LemiShine)
  • 1/2 cup Coarse Salt
*Use 1 Tbsp per load in the detergent cup.

TIPS:
  • I found you can make this recipe two ways: You can mix all of your ingredients together (which may end up clumpy if you don't have a jar with a moisture/airtight seal), or
  • Mix everything together but the citric acid! (The citric acid is what makes this recipe clump.) Add it directly to the dishwasher cup when you add the Tbsp of detergent. 1/4 to 1/2 tsp should be enough for each load.
  • Silica gel packets might help with the clumping. They absorb moisture! (They are the same little packets you find in the boxes of new shoes, leather handbags, or even electronics.) Drop the packet directly into your container. (This is what I plan on doing since I added all of my ingredients together. I'll keep you updated!)
  • If you have a prewash cup on your dishwasher, you can add a Tbsp of detergent there too. But you may not need it. Test it out on your next load of dishes.
  • Fill the "Rinse" compartment with white vinegar.
  • Find a cute container to store your batch in. Perhaps one with a seal (like a mason jar), or a glass jar with a lid. I found mine at a local thrift store for $2.00! It was part of a set (each sold separately), and I only wanted the one with the spoon (the other 2 were missing theirs). It's been sitting on my counter for months empty, and I thought it would be perfect for this project! I used my Cameo to cut the vinyl label on the container. I think it looks fabulous!
  • Everyone's water is different, so play around with the measurements if it's not working for you. Make adjustments to the recipe to suit your needs. A big part of making things yourself is figuring out what works. It's also one of the best things! Modifying a recipe is so easy....
  • So feel free to double or triple this one! 

4.2.2013 - UPDATE: I've been using this for a couple of weeks now and couldn't be more amazed at the results! This simple recipe cleans my dishes just as good, if not better, than the store bought tablets I used to use. We don't have hard water up here (in Washington), so I can't give you any advice on that. Our dishes always come out sparkling clean, without a rinse aid. In regards to clumping, I haven't had a problem with that at all either. I thought it would be an issue since I added the Citric Acid directly to my recipe. All I can say is that I'm extremely happy to finally be rid of those expensive dishwasher tablets! I'm definitely sticking with this for good :D

8.17.13 - UPDATE: I recently restocked my supply of soap a few days ago. Can you believe I haven't had to since I wrote this post! That is how long that first batch lasted me! That is the good thing. Bad news is that it has been extremely humid here in Washington this summer. And unfortunately, that new batch of soap turned into a rock overnight. All of that moisture, and the citric acid appears to be  the main culprit. So when the time comes to make my next batch, I will be omitting it from the main recipe, and adding it directly to the dispenser when I run a load of dishes. I hope that will solve the clumping problem. I'll keep you posted...

If you're looking for more "green" products, take a peek at my homemade recipes for Stain Remover, Laundry Detergent, and Fabric Softener. And be sure to check out my "Earth Mama" pinboard on Pinterest! It's chock full of inspiration and recipes for various green products. From green cleaners to natural health and beauty care...It's on my bucket list to create everything on that board!

Wanna stay updated on my recent posts and projects? Be sure to "like" my new fan page on Facebook!

Do you make your own green cleaners too? What do you like most about using homemade supplies? Any thoughts, questions, or comments? Please, let me know. Your feedback is always welcome and much appreciated.

Mahalo for stopping by!

Saturday, March 16, 2013

Living Green: Spring Cleaning Preparation

I'm proud to say that I've successfully and inexpensively replaced all of our essential household cleaners with "greener" versions, and 90% of them are homemade! Why do I love homemade supplies? Because I know exactly what is coming into my home. The cleaners I use every day need to be safe! I don't want to expose the people I love most, to toxic and harmful chemicals or fumes when I don't have to. And honestly, I think that everything I'm using is just as good, if not better, as their chemical counterparts. Plus, it's way cheaper in the long run. Also, I feel such a huge sense of accomplishment knowing I made it myself, and extreme happiness knowing that I'm doing everything I possibly can to protect the health & well-being of my family.... and this planet! Because they're worth it!

I have an arsenal of cleaners (that I made myself). In my household, we use homemade laundry soap (powdered), liquid fabric softener, stain remover, tub and shower cleaner, liquid hand soap, drain cleaner (2 simple ingredients), and window cleaner. The only thing I purchase at the moment is an All-Purpose Cleaner (which I know I can easily make myself, not sure why I haven't made the switch yet) by BioKleen , Dish Soap (can't wait to try the homemade version I found!) by Method, and Scrubbing Bubbles Toilet Scrubbers (still looking for a replacement for this one).


As a newbie blogger (just a month old), I've only had the chance to write about one recipe which I've been using for 6 months now. [Check out my Laundry Soap DIY.] In the future, I'm planning on sharing the recipes on my list of "Essential Green Cleaners and Supplies" which I think every household should have. They're so easy to make, the ingredients are so versatile, and it's also very inexpensive to replace all of your standard chemical cleaners. And best of all, they're safe!

I'm also excited to share some new recipes I've discovered. I'm looking forward to testing them out and sharing the results with you in future posts! Here's just a peek at a part of my "To-Make" list for the coming sunnier seasons... Cleaning Products [dish soap, Febreze, Goo Gone, foaming handsoap (for my toddler)], Beauty Products [blush, lip balm, body lotion] Health/First Aid/Homeopathic [insect repellent, hand sanitizer, using essential oils], Soy Candles.....

Click here for my ----> Dishwasher Detergent DIY

When it comes to homemade "green" and "natural" products, there are so many things I want to try and make! I'm so glad all of my inspiration is in one place :) My "Earth Mama" pinboard on Pinterest. Creating everything on that board is on my Bucket List; I've already knocked some things off of it! There are so many great ideas! Some are simple and inexpensive enough for a newbie looking to start a small lifestyle change; other pins are a little challenging and require more essential resources and ingredients that an experienced ecofamily may already have in their supply closet. Check it out! I'm sure you'll find something you haven't made or can't wait to try. Follow me too to stay updated.

I'm preparing you for the posts that will be showing up in the coming month. Starting with lots of "green" recipes to stock up your arsenal for spring cleaning! In my next post, I'll be sharing a new recipe I was so excited to try... Dishwasher Detergent. So simple to make and I hope it works well! We'll see... I'll be happy to use it in place of those spendy dishwasher tabs we've been using for years! Be sure to check back often to see what I've else been working on! It's going to be fun getting my hands dirty, or I guess you can say... clean ;)

Thursday, March 14, 2013

Reuse Project: Crafty Organization


I definitely consider myself pretty crafty, and I was exposed to the green life at a very early age. So naturally, any project that involves repurposing/reusing everyday household items (that would normally end up in the landfills), and the chance to add a touch of my own personal creativity, is really a dream project!

I make it a habit to check out all of the food containers before they get to the recycle bin or trash can, and I save the good ones that I know I can reuse. If you have the extra space, start saving your containers! I have a shelf in one of my kitchen cabinets designated for them. You'll find different types in various sizes. My favorite kind to reuse are glass bottles or jars! Spaghetti sauce ones have measurements on them, baby food jars are perfect for corralling small items, large jars from pickles or juice can hold other food items too (ours hold uncooked pasta), and candle holders (lidded or not) are also great for organization!


Over the years, I've gained knowledge of what goes in and out of our family's home. From the organic food (along with its packaging) that comes in to it, to the garbage and recyclables that get taken out every week. And looking at our trash, I saw that one of the snacks we love so much, was also a huge contributor to our garbage. But I realized they also came in really awesome lidded cans! That is how our abundance of Honey Roasted Peanuts containers came to be...

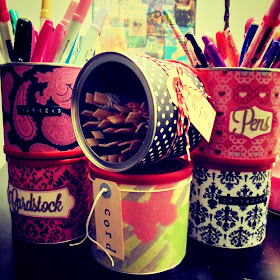
Today I'm going to show you how easy it is reuse almost any container, and at the same time make that container look like it was never used to hold food! Let them be cardboard containers that once held snacks (like mine) or large aluminum spaghetti cans, this technique can be applied to almost anything. But the first thing you must do in any case, is give them a good cleaning!


SUPPLIES:
  • Food Containers (That Need a Facelift)
  • Scrapbook Paper - Scraps are best!
  • Mod Podge - Matte is what I use.
  • Paintbrush - Preferred over the foam ones.
  • Labels, Tags, Cameo Cuts
  • Stuff the Needs Organizing
Thoroughly clean each container with soap and water. The ones I have are lined and made of thick cardboard and hold up really well. Quick washes and rinses of soap and hot water are all I need to clean them. But don't let the cardboard containers sit saturated in water though for obvious reasons! I also  like to hand-dry everything.

1. Trim your paper(s) to fit the desired container. In my case, they are all scraps from my homemade daybooks. They're a near perfect fit and need just a slight trim!

2. Working in sections, spread an area of the container with a good layer of Mod Podge. Slowly place the sheet of paper over the glue. Be extra careful to keep the paper straight each time! Rub the paper to smooth out bubbles and creases.


3. Repeat the previous step until your container is completely covered. Make sure that paper is lined up straight! You will start to see it wrapping at an angle, but don't let that happen.


4. I'm using a strip of coordinating patterned paper (more daybook scraps) to cover a small gap since my 12" paper is too short. I think it's a nice little detail... clever and cute!


5. Now comes the fun part of adding a label! I wanted to have some fun with mine and decided to mix it up a bit. I used stamped tags with twine or cord, labels with Cameo cuts, and strips from my Dymo Label Maker.


6. Fill 'er up! I store mine with clothespins wrapped in twine or cord, cardstock and chipboard embellishments, pens/markers, etc. The possibilities are endless!


The fabulous thing about my repurposed food containers is that they stack very well! You can use them without a lid  to hold pens or scissors, and with one to hold just about anything else. They can really be customized to fit the theme in any room, and are so versatile they can hold more than just crafty supplies!

I really loved this Reuse Project. I got to destash and reuse two of my supplies... my ever-growing scrapbook paper stash and the food containers I've been hoarding! And I got fabulous storage in the end!  This is definitely what I like to call Frugal & Crafty Organization: The art of repurposing and reusing everyday objects in creative ways, and providing simple storage solutions...without spending a penny.

Do you like to reuse glass jars but hate that the metal lids from those containers still have all of that ugly food jargon on it? I sure do! I figured out how to cover those ugly metal food lids with scrapbook paper, so now all of those glass food jars will look gorgeous from top to bottom. Check back soon to find out how I do it....

Wanna stay updated on my recent posts and projects? Be sure to "like" my new fan page on Facebook!

Any questions, thoughts, or comments about this post? Feel free to drop me a line. Your feedback is always welcome and much appreciated!

Mahalo for stopping by!

Wednesday, March 13, 2013

Project Life: Week 10

I'm absolutely loving this whole documenting everyday life thing! Even though we don't do super important things each and everyday, recording just the little things too makes it that much more special. I do have to say that keeping my journal handy really helps me stay organized with my blog and Project Life..and whatever else I have on my mind! (I'll be showing you my cute little notebook soon!)

Life Documented
March 3 - March 9


We started out the week with a lazy Sunday watching Netflix, got spoiled midweek by Daddy with new video games, and ended it with a nice weekend out and about in a rental car.

Week 10 - Left Page

The left page, made by We R Memory Keepers, was specifically designed to hold their 2x4 double-sided journal cards (which you can see along the right side of the page). I used the lined-side of these slim cards as little journaling spots for the larger 4x6 cards. They are also the perfect size to hold mini instax pics (bottom right). On Sunday, I took a screenshot from the Netflix app (on our laptop) showing the movies we watched that day and  printed it on cardstock. The banner and potty people were cut on my Silhouette Cameo. Photos on the page consist of a standard 4x6 (embellished with various washi and a camera printable) and a mini instax photo covered with washi tape.

Week 10 - Right Page

For the right page I'm using Becky Higgins Design A. I love having the 3x4 spots for all of the 3x4 journal and filler cards I've collected! (I originally had just the We R Memory Keepers Photo Pages, but noticed they didn't make a page for 3x4s, so I ordered a set of Becky's from amazon.com.) 


This page contains a variety of journal cards. I use a few of Miss Tiina's lovely free printables (in both 3x4 and 4x6) along with some others, a 4x6 journaler by WeRMemory Keepers, and I also cut some 4x6 cards on my Cameo using Kraft cardstock. I included another mini instax photo as well as a couple of instagram pics. More washi tape, some Cameo cuts, Cosmo Cricket Tiny Alphas, some more ephemera, an arrow post-it (found in Target's Dollar Bin), a date strip from my Dymo, a Hero Arts Alphabet Stamp Set, a We R Memory Keepers Blank Date Clear Stamp, and a Studio Calico Roller Date Stamp were used to finish off the week.

See something you like? You can find all of the printables I've used this week on my SMASH* & PL or Printables/Templates pinboards on Pinterest. Be sure to follow me on Pinterest to stay updated, I find new stuff daily!

Thursday, March 7, 2013

DIY: Glimmer Mists


I don't know about you, but I absolutely love making my own craft supplies! I have to say that I get pleasure from making things myself! I also love the idea of not spending any money by using supplies I already have on hand. Frugal and Fun! 

Glimmer Mists are a great element to have in your arsenal. I love the subtle color and glimmery "eyeshadow" effect they provide. I've used them as a background to some of my SMASH* pages, on the Kraft cardstock of my homemade daybooks, as well as on wood veneers and naked chipboard. I'm always looking for new ways to use them!

Last month I took a crack at making Alcohol Ink for the first time. It turned out awesomely! You can find that blog post here. But I first started making my own Glimmer Mists about 6 months ago, when I came across a video on YouTube. It seemed easy enough, and decided to give it a try. The video was very helpful to get me started. But I came up with my own recipe and technique for making them, that I want to share with you today.


SUPPLIES:
  • Acrylic Paint in Your Favorite Colors
  • Metallic Acrylic Paint in Pearl White
  • Mod Podge - I use the Matte version
  • Mini Spray Bottles - You will find them in the Health and Beauty Dept. of your local Target/Walmart (Look in the Travel section that has all of the little sample-sized bottles of shampoo)
  • A Paintbrush


The first thing you need to do is fill your spray bottle halfway with warm water. Then you are going to dip the handle end of your paintbrush into the bottle of Mod Podge. Take the brush with the "gluey" end and stick it directly into the bottle of warm water. Give it a few good swirls. *The warm water helps to dissolve the glue (which acts as a binding agent).


Next, you are going to add your colored acrylic paint. Be sure to shake up your paint bottles first!. I don't really have an exact measurement as to how much paint to use. Over time, I've learned to just eyeball it. But I'm sure that a 2-3 second "squeeze" should suffice. (Don't worry though, you can easily make adjustments later!)


Lastly, you will need to add the Pearl White Metallic Paint. This is what gives you the glimmer effect. I usually add a little bit more of this paint than I do the colored paint, just because I want to make sure that it's extra glimmery. A 3-4 second "squeeze" should do.


Tightly secure the spray nozzle to the bottle and shake it up really well. You will immediately see the glimmery specks in the bottle. At this point, you'll want to spray a sheet paper (and let it dry) to see if you need to make any adjustments to either the color or the metallic paint. It all depends on your taste. And that is pretty much all there is to it!


Over time, when you aren't using your sprays, you may notice that the paint will settle to the bottom of the bottle. No worries though. Just give them a few good shakes before using!

TIP: You may also discover that your sprayers clog when you let them sit unused. No problem. Just detach the little spray cap and run it under hot water. If it's still clogged, let the cap sit in a cup of hot water for a while. If your sprayer is still being stubborn, unscrew the spray nozzle and place the straw (with attached nozzle) directly into a cup of hot water. Spray into the sink as you normally would. Keep spraying until the water is clear and the spritzer is misting as it should be.

There you go! Now you can start experimenting with different colors and replace all of your sprays with your own homemade collection. Doing that should be so easy and inexpensive, especially if you do what I did and use stuff that you already have. FYI, This project didn't cost me a penny! I even have a stash of empty spray bottles ;)

Wanna stay updated on my recent posts and projects? Be sure to "like" my new fan page on Facebook!

Do you make your own craft supplies too? I would love to hear your tips and recipes! Do you like having photos included in the tutorials? Any thoughts, questions, or comments? Drop me a line! Your feedback is always welcome and much appreciated.

Thank you for stopping by!

Wednesday, March 6, 2013

Frugal: Printing and Printables


You wouldn't believe the amazing free things you can find on the internet! Ever since I started SMASHing a little over 6 months ago, I've found hundreds of FREE PRINTABLES online. And when I say hundreds, I mean hundreds! If you don't believe me, check out my "SMASH* & PL" or "Printables/Templates" pinboards on Pinterest. My Smash* board has over 300 pins of printables, DIYs, Ideas, and Inspiration for everything Project Life, Smash Books, & Daybooks. My "Printables" board alone has close to 300 pins of nothing but printables! My personal collection of journal cards and printables is so large, that I have never had to purchase any to use in my books.


I belong to various social networks and like to share the fun things I find. I get exceptional feedback when it comes to photos of my printables. I have people across the different social sites asking me why my printables look so good. I've been bombarded with questions... from the paper I use, to the printer I have! They basically want to know what I'm doing to make my printables look like they came from a print shop. I thought what better time than now to share my "Printables Process" with you. And you wouldn't believe how cheap and easy it is!

You just need the right tools and some helpful tips...


Tips & Supplies to Get You Started:
  • Ink -- I print my printables on a monthly basis. But I have to set a budget when it comes to buying ink every month, or else it gets really spendy! A box of  ink (1 color, 1 black cartridge) costs me less than $30 and I make it last about a month or two. (My black ones last for 3+ months!) Those cartridges have to go a long way and cover all of my printing needs for the month! I do A LOT of printing... instagram pics and standard photos for Project Life each week, printables for my personal stash, as well as the extras I print and share with my happy mail buddies every month.
  • Printer -- I use an HP 2050 All-In-One Inkjet Printer. 
  • Cardstock -- 110lb White Card Stock by Georgia Pacific. You can purchase a ream of 150 sheets for less than $6- at Walmart. It's perfect for printables!
  • Before printing, be sure to adjust your printer settings! For the best results, choose "Best Quality, Specialty Paper."
  • Remember: Just because your printer's "Low Ink" notification pops up, it doesn't mean you need to change the cartridge right away! (When printing my most recent batch of printables, the "low ink" light came on. I got 16 more "perfect" pages printed before the ink started streaking, and I had to change it!)
  • Cardstock uses more ink than regular paper, as will the "Specialty Paper" setting. So be prepared for that...
  • Paper Trimmer -- This tool helps make the "process" much easier and faster. The clean, straight lines it gives you, makes your printables look fantastic! I own an EK Success "Cutterpede" Straight Edge Trimmer in Pink, which I purchased here.
  • A Good Pair of Scissors -- It makes a world of difference when cutting out the intricate paper embellishments you printed. I cannot live without my Tonic Studios Spring-Cut Detail Scissors that I purchased from amazon!
But before you can do anything, you need to find your printables first! Feel free to check out my pinboards on pinterest :) I'm sure there'll be something there that you'll like! Throughout the month, I'll find something I know I want to add to my collection. So I download it and save it to a folder on my desktop titled, "To Print." Then at the end of the month, I don't have to go searching everywhere to find my new stuff. Once that batch is printed, I move those files to my "Smash & PL" folder on Skydrive and separate them into the appropriate sub-folder. This way, I know exactly what I have, and can easily reprint anything that I use.

You obviously know by now that I'm a huge fan of FREE SMASH* and Project Life printables. So, you may be wondering who my favorite designers are. 

Here are two of them:

Some of the Fabulous Designs by Rebecca B. of UPrintables

Rebecca B. is such an awesome designer, and she's also a fellow SMASH*aholic sister! She is most known for her amazing cutouts. From cute little animals (like owls, or hedgehogs), to different styles of cameras, and much much more. Her designs get more gorgeous with every post, and her newest ones are absolutely amazing! You should see what she has coming up for this year! A lot of what you see around the internet, when it comes to free SMASH or PL printables, is journal cards (don't get me wrong, I love them!),  but Rebecca is the only designer I've found that also does these fun cutout shapes and designs! Which in my opinion makes UPrintables a wonderful resource for FREE SMASH and Project Life printables. Check out her blog here, and be sure to follow her... she is constantly coming out with new and fun designs I just know you'll love!

The Everyday Collection by Miss Tiina

I was ecstatic when I first came across Miss Tiina's stuff 6 months ago, when I first started SMASHing. I fell in love with the fun fonts and rainbow of colors she uses! But most of all, I absolutely adore her designs! They are so happy and cheerful and just my style. The best thing about Miss Tiina's stuff is that she makes "Collections." She has sets of cards ranging from 75 to 100+ different designs, that all coordinate together. Each set has a mix of 4x3 and 4x6 designs. In each set you'll find different styles of journal cards like ones with quotes, calendars, prompts, graph or lined paper, chevrons, stripes, labels, etc. Pretty much, a little bit of everything! These "collections" are the perfect addition to add to your collection. Take a peek at Miss Tiina's blog here. She has lots of fun, free stuff!

I really hope you enjoyed this post and most of all, found it useful! It's stuff I wish I learned early on when I first started gathering supplies for my personal stash. Be sure to follow my "SMASH* & PL" and "Printables" boards on Pinterest to stay updated with my recent "Free Printable" finds. I'll also be posting some pics of my recent favorites here in the future, with direct links to where I found them, so be sure to follow my blog as well.

Want another way to stay updated on my recent posts and projects? Be sure to "like" my new fan page on Facebook!

Do you print at home too? Did you find this post useful? Do you have any tips you'd like to share? Any thoughts, questions or comments? Please let me know, your feedback is always welcome and much appreciated.

Mahalo for stopping by!

Tuesday, March 5, 2013

Daybook of Love: Weeks 3 - 4


For "The Month of Love", I used a handmade daybook to document each and every day. It's practically bursting at the seams with memories we shared together, as well as things I love. In the end, it turned out fabulous... I love how super chunky it is!

Last month, I posted Days 1 -14 of my February Daily Daybook. And today, I'm so happy to finally share the remaining pages with you! I had so much fun creating this book, and I love flipping through it to see all of my memories from the month right there in one place! Daybooks really are a great way to document everyday life...

Life Documented
Days 15 to 28

Day 15: Chick Flick Marathon
Day 16: Crafty
Day 17: We Love Sundays
Day 18: Sweet Treats
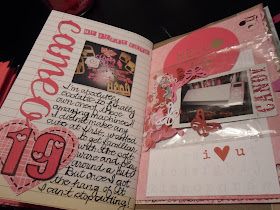
Day 19: My Cameo Named Candy
Day 20: Rainy Day
Day 21: Honu Love
Day 22: Me + You = Love
Day 23: "Currently"
Day 24: Project Life
Day 25 (Part 1): Love Letters
Day 25 (Part 2): My VDay Card 
Day 26: The Greatest Gift
Day 27: Mini Instax Love
Day 28: Words of Wisdom