Tuesday, June 25, 2013

Thrifty Finds: Apothecary Jars

Hello everyone! I hope you're enjoying your week. It's been a while since I've done a post about "organization," so today I thought I'd share one of my favorite storage solutions to grace my crafty space. And I have to say, not only are they functional, but they're also very pretty to look at.

I'm always searching for new and fun ways to organize my life. Any chance I get to make that choice a "frugal" one, I jump on it. For me, getting organized doesn't have to be expensive. I'm all for repurposing something that was destined for the recycle bin. But when I came across these jars while shopping one day, I had to have them!


I've always been a bargain shopper... and not just for "new" things. I frequent our local thrift stores, and you'd be amazed at the wonderful things I find. I especially love scouring the shelves for books, household goods, home decor, craft & office supplies, woodwork, and dishes/glassware. That last section happens to be the aisle where I found these lovely, lidded vessels. It's always the first area of the store I hit!

These little gems have become quite popular and are pretty hard to come by. So if you spot one (or two), don't pass them up! Because I guarantee you, they won't be there if you decide come back for 'em later. Lucky for me, over the last year I've collected more than a half dozen of these glass storage jars for less than a dollar a piece. Definitely worth every penny!

My collection of apothecary jars consists of various styles. From a classic bell shape to a fun mushroom design. I love mixing them up and placing them out in groups of three around our home.  My favorite stuff to fill them with are little bits from my crafty, scrappy stash. Instead of having those tiny items tucked away in a box somewhere, I can display them in these clear glass jars. This way, I know exactly what I have. And I love looking at all of the pretty goodies!

Apothecary Jars to Hold Tiny Bits & Pieces from Your Scrappy Stash
Here I'm using them to store bits and pieces in my creative space. One jar holds felt flowers and embellishments, another has decorative paper clips, tiny clothespins, and cute little erasers. My most favorite  jar holds all of my flair! Half the fun of having these types of jars is finding stuff to fill them with. 

They are incredibly spacious and can be used for just about anything. That's why you won't only find them in my craft room. They hold yummy candies and new tea light candles in our kitchen, and Q-tips, cotton balls, and bath salts in our bathroom. With your imagination, the possibilities are endless!


You have to admit they look perfect in my craft room, don't they? Especially next to my Crafty Storage Containers! I wasn't kidding when I told you I was all for repurposing items meant for the trash bins. Those pretty, paper-covered, storage containers hold more of my crafty, scrappy supplies. It's another fun and "frugal" solution that satisfies my storage needs. Be sure to click on the link for my DIY!

Wanna stay updated on my recent posts and projects? Be sure to "like" my new fan page on Facebook! Looking for more storage solutions? Check out my "Organize It" pinboard on Pinterest. You'll find links to inexpensive DIYs, clever ideas, and tons of inspiration to get your life in order. Feeling crafty too? Take a peek at my "Crafty Mama" pinboard or my other crafty boards on Pinterest. Feel free to browse my blog as well :) I have lots of great DIYs!

I hope you enjoyed today's post! Are you a thrifty shopper? Find anything fabulous? Any thoughts, questions, or comments about this post? Please let me know. Your feedback is always welcome and much appreciated!

Thank you for stopping by!

Saturday, June 22, 2013

Project Life: Weeks 22 - 23


Happy Summer!

I hope you're all having a wonderful weekend and enjoying this gorgeous weather! As for me, I'm spending this lovely weekend catching up with Project Life. I fell behind by a couple of weeks when when we were vacationing in our hometown of Portland, OR. Unfortunately, I didn't have much time for scrapbooking. But it wasn't hard for me to get back on track. And I'm happy to finally share my most recent layout in my 2013 Project Life album....

Weeks 22 & 23: Double Week Spread

Having very little to document for Week 22 and being behind in Project Life, actually worked to my advantage. I was able to easily knock out 2 weeks by doing a single page layout for both Weeks 22 & 23! It worked out great. I used a fun mix of colorful cards and embellishments for this spread, and had tons of fun putting it all together. From the Cameo cuts with hand-drawn frames on the title cards, to the eclectic variety of captured moments. These pages puts a smile on my face every time I look at them.

WEEK 22
Life Documented
May 26 - June 1

Week 22: Left Page

This page is the reverse side of the We R Memory Keepers photo page from Week 21. It has a large 12x6 slot that I divided into separate sections to hold two 6x6 WRMK journal cards. I cut a fancy tag on my Cameo and used it as a mat for the title card. That tag looked very blah... so I doodled a frame around the edge. I added some cute cutouts, journaling, another Cameo cut with more hand-drawn detail, and some thickers & stickers to finish off the 6x6 cards.

Week 22: Left Page - Close Up

For the remaining vertical 4x6 cards, I decided to mix it up. The center card is a WRMK journal card. Two of the cards I handmade using Amy Tangerine's 6x6 "Sketchbook" paper pad. A simple cut along one edge provided the perfect backdrop for my photos and snippets.  More alphabet stickers, journaling, a Dymo label, tag, and sticker complete this page.

WEEK 23
Life Documented
June 2 - June 8

Week 23: Right Page

Here I'm using a Becky Higgins Design A photo page. I chose this one because I had a lot more to document compared to Week 22. I decided to mix up the cards on this side too. The 6x4 cards on top are both handmade. On the left, is a 2x4 WRMK journal card paired with a 4x4 photo. For the title card I used a 6x6 sheet from Pebbles "Hip Hip Hooray" collection cut to size. Just like the previous week, I used a tag cut with my Cameo as a mat. And again I doodled a frame around it for that extra little detail. I also got to use a 6x4 card from Becky Higgins "Mayfield" edition, as well as a 6x4 journal card by WRMK, which holds two instagram pics perfectly.

Week 23: Right Page - Close Up

The row of 3x4 cards are all free printables. I chose two watercolor cards to hold my smaller photos, and a cute filler and calendar card for the remaining slots. Some journaling, alphabet stickers and thickers, Dymo labels, cutouts, and a variety of stamps finish off this spread.

I absolutely love how these pages turned out! Best part, I got caught up real quick by doing only single page layouts for each week. I'm definitely going to keep this in mind when I fall behind again and have little to document.

Want to take a peek at my 2013 Project Life album? You can find it here. Like the free printables I used? You can find them on my "Smash* & PL" or "Printables/Templates" pinboards on Pinterest. Not only are there printables, but you'll find hundreds of links to DIY's, How-To's, tips, ideas, and inspiration for everything SMASH* and Project Life. Check it out!

Are you a documenting 2013 with Project Life? What do you like about it? Any thoughts, questions, or comments about this post? Please drop me line. Your feedback is always welcome and much appreciated!

Thank you for stopping by!

Thursday, June 20, 2013

Smashbook: "Rainbows"


Aloha! I hope you are having a wonderful week. As for me, I feel like I've been neglecting my SMASH* books a lot this year. I guess it's for good reason, since I'm slightly obsessed with Project Life at the moment. But it's okay... although I haven't been working in my SMASH* books for 2013, I'm happy to share some of my old creations from last year here on my blog.

What I love most about SMASHing is that I can do whatever I want in my books. They are a huge reflection of myself, filled with a mix of different spreads representing what I was feeling at that particular moment in time. Some of the pages hold photos and memories documenting everyday life or special adventures, but other pages have no photographs at all. Being able to step outside the box of typical "scrapbooking" to find new and different ways to spread my creativity is truly invigorating. 

I love flipping through my book and seeing all of the different spreads. And I have to say the ones that don't hold a single photo are some of my favorites. From "100 Things" and "Words of Wisdom" to "Zentangles & Prompts" and "Our Love Song." Believe me, running out of photos or tangible things to SMASH* can be a very good thing... there are so many other ways to create something beautiful in your book.


Today I'm sharing my first mixed media art spread that I created last summer in my pretty pink book. In every SMASH* book, there is a single white page. I thought that it would be the best place to do an art layout. The one in my pink book is followed by an image of birds and clouds. It was the perfect inspiration for a spread about "Rainbows" using one of my favorite quotes!


I started out by drawing a sun, and used a Dear Lizzy chipboard cloud as a template for the cloud shapes, then I outlined them with my black Zig marker. I filled each cloud with different doodles and designs and added the chipboard cloud as another layer. Then I used a mix of Prismacolor Scholar and Zig markers to create the rainbow and add color to the clouds and sun. For the remaining white areas of the page I chose a grayish-blue shade of Pearlescent Watercolor Paint by Yasutomo.


The quote I chose for this spread couldn't have been more perfect. Since handwriting and penmanship is a passion of mine, I decided to write the quote by hand instead of using alphabet stickers. As another element, I used standard school glue with a bottle of Doodlebug Sugar Coating loose glitter to create some raindrops. I also added a few rain themed stickers.


I love using magazine clippings in my SMASH* books. As a matter of fact, I actually have an accordion file full of different images and words. When I came across these cute "Mommy and Daughter" rain boots, I had no idea what I would use them for. I'm so glad I snipped them, because they work great for these pages! I think they're the perfect finishing touch to my "Rainbows" spread.


I hope you enjoyed my post today and leave here feeling inspired to create something beautiful in your books. Remember, photos and journaling don't have to be the only things that fill them. Have some fun and mix it up a bit! I'm sure you'll enjoy the variety when you are flipping through them years down the road...

Want to take a peek into my pretty pink book? You can find it here. Looking for more SMASH*ing inspiration? Be sure to check out my "Smash* & PL" pinboard on Pinterest. It has hundreds of links to  DIY's, How-To's, free printables, tips, ideas, and inspiration for everything SMASH* and Project Life.

Wanna stay updated on my recent posts and projects? Be sure to "like" my new fan page on Facebook!

Are you a SMASH*er? Have you done a mixed-media spread yet? What elements did you use? Any thoughts, questions, or comments about this post? Feel free to drop my a line. Your feedback is always welcome and much appreciated!

Mahalo for stopping by!

Monday, June 17, 2013

Printables: June


Happy Monday Everyone! I hope you had a wonderful weekend. Today, I'm happy to finally share my recent batch of free printables for the month. If you missed last month's post, you can find it here. Are you new to at-home printing? Be sure to check out this post full of helpful hints and tips, as well other ideas and information, to help you get started with printing your own cards for SMASH* and Project Life.

I like to print a big batch of cutouts and cards to add to my stash on a monthly basis. I do it this way to save money and make it easier on myself. You wouldn't believe how expensive at-home printing can be if you don't set limits. It can also get pretty tedious and exhausting to print and cut each and every day you find something new online. Doing them once a month works for me and my budget. I need those ink cartridges to go the extra mile... not just for my own printables, but also printables for swapping, everyday Project Life and instagram photos, and regular household printing each month. I'm proud to say with this process, I can make an ink cartridge and white cardstock last for months!

Every month I look for specific types of cards to add to my collection. This month, I kept an eye out for fun and colorful journal and filler cards that represent everything I love about summer. There were so many to choose from! Here in this post I'll be sharing a few of my favorite finds....

SUMMER FUN
On the Left ----> "National Scrapbooking Day Cards" by Simple Stories
On the Right ----> "June Cards" by Kimberly Kalil

I love the set from Simple Stories! They include both 6x4 and 3x4 journal cards with cute and colorful designs that totally work for documenting the summer season. And the adorable set by Kimberly Kalil couldn't be more perfect either. They have summer written all over them! She releases a set of new cards every month, and I'm so in love with this one. I can't wait for the rest of her cards coming this season!

OH SO GIRLY
Top Left ----> "Soft Triangles" by Crashnotes
Top Right ----> "Besties" by DDE
Bottom Left ----> "Free Spirit" by Laurie Ann [on Facebook]
Bottom Right ----> "Shopaholic" by Sugary Fancy [on Facebook]

I'm not really a girly girl, but my 4 year-old definitely is. What I do love most about this group of cards are the beautiful colors and designs. The pretty pastels and other gorgeous shades work great for summer as well. I chose to print the first set of cards [Soft Triangles] on both white and Kraft cardstock for two totally different looks. The "Besties" set is so stinkin' cute! I can't wait to use them this summer to document the fun times my daughter has with her friends. I'm in love with the stunning colors and sweet designs on the "Free Spirit" cards. But I have to say, my favorite from this group are the "Shopaholic" cards. I'll be using those for sure!


That's all I have for you this month :) I really hope you enjoyed my post today and found a few new printables along the way! If you see some cards that you like but I didn't feature it in today's post, don't worry. You can find all of these cards and hundreds more on my "Smash* & PL" or "Printables/Templates" pinboards on Pinterest. Be sure to follow those boards because I find new stuff daily! Also make sure you are a follower of my blog to stay updated on my printables adventures. You can also stay updated on my recent posts and projects with a "like" on my new fan page on Facebook!

Are you a printable lover that prints at home too? Any thoughts, questions, or comments about this post? Please let me know. Your feedback is always welcome and much appreciated!

Mahalo for stopping by!

Wednesday, June 12, 2013

Project Life: Week 21


Aloha! I hope you're enjoying your week so far. As for me, I'm trying to play catch up in my Project Life album. Life has been a bit crazy, plus I ran out of ink and couldn't print any of my photos! Thankfully, I restocked my supplies and now I'm back to documenting everyday life. Today I'm happy to finally share the most recent spread I created in my book....

WEEK 21
Life Documented
May 19 - May 25

Week 21: Full Spread

It really was a wonderful week here in the Pacific NW, full of so much love. I felt the Aloha spirit everywhere. The variety of photos captured show this love through the beautiful spring flowers, our stuffed mailbox, and even a visit from our beloved family. And I decided to mix it up a bit with the elements that adorn these pages. I got to use some new supplies, as well as try a new technique that I absolutely adore!

Week 21: Left Page

This layout is the back side of a Becky Higgins Design A photo page from Week 20. I filled it with a fun mix of 6x4 cards. The red title card is from Becky Higgins "Mayfield" Edition, which I got for free with a $50 gift card that I received when I cashed in the Swagbucks I earned. (I'm not paying a penny for Project Life supplies this year!) For the next slot, I used a 4x4 instagram pic and a 2x4 We R Memory Keepers journal card to document the "Just Because" flowers my boo gave me. I also chose a WRMK 6x4 journal card with a "Mail" theme to showcase the Happy Mail I got from a girlfriend. I even used one of the tags she gave me as a journaling spot. The last of the large cards is a beautiful postcard from Hawaii that I got from another friend. It was actually the color inspiration for my spread this week.

Week 21: Left Page - Close Up

The smaller 3x4 slots are filled with a few free printables and the backside of a journal card from last week. I chose a filler and journal card that complements my color theme, as well as a "Currently" card printed on Kraft cardstock, which I wrote on with a white gel pen. For the reverse side of the card from last week, I added a wallet-size photo and a small journal tag to document my shopping haul.

Week 21: Right Page

This page by WRMK has a large 12x6 section on top, with 3 vertical 4x6 slots on the bottom. I decided to break up the large section by using a sheet from Amy Tangerine's 6x6 "Sketchbook" paper pad. This blue frame design works great with the photo and has just enough room for some thickers.

I filled the vertical 4x6 slots with some sweet snapshots from the day. For some reason, my printer didn't print full sized photos on the 4x6 photo paper I used. So I added some labels from my Dymo directly to the small white sections below each picture. It couldn't have worked out more perfectly...

Week 21: Right Page - Close Up

For the other half of that large 12x6 section, I used a 6x6 journal card by WRMK. The house is a Cameo cut which I backed with a complementing scrap of paper. I added some Scrabble letters from a set of free printables I found a while back. I used my white gel pen again to document the details.

As far as embellishments go for this spread, I kept it pretty simple. I choose a fun mix of alphabet stickers and thickers, pretty twine, an acrylic date stamp, a Dear Lizzy roller date stamp, and Amy Tangerine's new rotary phrase stamp. I also got to play with a new technique for the finishing touch....

Week 21: Title Card with Hand Stitched Detail

Along with Becky's PL "Mayfield" Mini Kit and Amy T's Rotary Phrase Stamp (that I scored for free from amazon.com), I also picked up Amy Tangerine's "Capture" Embroidery Stencil Kit. As someone that hand sews all of her handmade daybooks, I was aching to give it a try. This title card was totally calling out for some hand-stitched love. The kit came complete with stencils, a mat & poker, and needles & thread. I also used some pink embroidery floss I already had in my stash from making daybooks. The whole process was pretty easy and the end result is simply beautiful. Along with it looking super cute, the actual act of hand stitching was incredibly therapeutic. I absolutely love this kit and can't wait to play around with the different designs on future projects! It's definitely a great addition for my scrappy collection.

Are you looking for more Project Life inspiration or interested in finding the free printables I used for this spread? Check out my "Smash* & PL" or "Printables/Templates" pinboards on Pinterest. There are literally hundreds of links to free printables, along with lots of ideas, inspiration,  tips, How-To's, and DIY's  for everything SMASH* and Project Life related. Want to take a peek into my Project Life album? You can find it here.

Are you a documenting 2013 with Project Life? Have you fallen behind and playing catch up too? Any thoughts, questions, or comments about this post? Please drop me a line. Your feedback is always welcome and much appreciated!

Mahalo for stopping by!

Friday, June 7, 2013

Smashbook: Words of Wisdom


Happy Aloha Friday Everyone! I hope you had a great week. I've been smashing for almost a year now, and a "Quotes" spread has been on my To-Make list since the beginning. I've been obsessed with quotes since childhood, and I have notebooks and journals full of them. Any great ones I came across, I jotted them down, referring to them throughout my life when I needed words of wisdom to help me through obstacles. Life hasn't always been easy, and seeing all these quotes talking about love or adversity, made me realize that I wasn't alone. I thought I would take this knowledge, and find a way to apply it to my beloved Smashbook. Today I'm sharing my most recent creation here with you...

Over the last year, I found some really beautiful quotes, and I chose my most favorite ones for this spread. I have to admit, that was the hardest part of this whole process. They were all special to me and I could easily relate to or understand the message behind all of them. But these particular ones spoke to me during this specific time in my life. I knew they were the ones I wanted to add to my book to later reflect on if I needed something to uplift my spirit, or give me clarity about life and its challenges. 


Like many of the pages in my pretty pink Smashbook, I chose to hand write everything. Writing and penmanship is another passion of mine since childhood. And it's a detail that I love adding to my books. If I know I'll be doing any type of writing, I make sure to choose pages designed with lines, or in this case, a grid. It's the perfectionist trait in me.... This way, I know my writing will always be neat and straight. The spread I chose here with the grid lines was perfect for this project, because I could also write vertically, mixing up the arrangement of the different quotes.

The white grid paper pages were way too plain for me though. So I decided to add some color by spritzing them with my homemade glimmer mist and alcohol ink sprays in shades of pink and purple. It provides the perfect backdrop for my handwritten quotes.


Before doing any writing in my book, I always start out in pencil. It may seem tedious at first, but it makes all the difference if it saves you from ruining your pages because of a misspelled word. It also lets you play around with the placement of things if it doesn't look right the first time. After I have everything where I want them, I go over the writing with my black zig pen and erase all of the pencil marks. I usually make another pass with the black pen to finish it all off.

As far as embellishments go for these pages, I kept it to a minimum. I let the quotes do all the talking. All I added were some glitter chipboard alphabet stickers and tiny pieces of bling. I don't think it needs any more than that.


This spread was so simple to make and required only a few supplies. But it's definitely one of the more special pages to fill my book. I love everything about it and what it represents. Most of all, I love having a new and creative place to hold all of those precious words of wisdom I come across in my life. This definitely won't be the only "Quotes" spread in my books....

Want to take a peek into my pretty pink smashbook? You can find it here, as well as in my archives, and also under the topic titled "Smashbook." Looking for more Smash*ing inspiration? Be sure to check out my "Smash* & PL" pinboard on Pinterest. It's full of hundreds of links to free printables, ideas, inspiration, and DIYs for everything Smash and Project Life related. While you're there, be sure to browse my "Wisdom" board for more inspirational quotes.


I hope you enjoyed my post and leave here feeling inspired to create something beautiful. Are you a Smash*er? Have you made your "Quotes" page yet? I'd love to hear about it. Any thoughts, questions, or comments about this post? Please let me know. Your feedback is always welcome and much appreciated.

Thank you for stopping by!

"Your Mission: Be so busy loving your life, that you have no time for hate, regret, or fear."

Tuesday, June 4, 2013

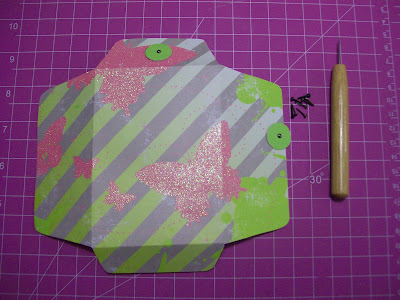
DIY: String Tie Envelopes


Hello everyone! I hope you're having a great week and enjoying this fabulous summer weather we're having! It's been a while since I've done something crafty with you here on my blog. So today, I'm happy to share this lovely DIY papercraft project. I've been making these for a while now and thought you would really like them.

If you follow my blog, you know that I love anything handmade, especially if it's made from paper. I originally came across this project almost a year ago when I was browsing through Pinterest. You can find that "pin" here on my "Printables/Templates" pinboard. After reading that post, I knew I had to add these fun little envelopes to my collection.

The original blogger provided a great tutorial, but certain aspects of the project didn't work for me. So I made some modifications to suit my needs and added a few touches that showcase my own personal style. Here is what I came up with...

SUPPLIES

  • Cardstock: White, plus a variety of colors and patterns. I use 12x12 scrapbook paper.
  • String/Twine: Embroidery Floss works great and is inexpensive.
  • Glue Stick
  • Scissors
  • Mini Brads: Mine are 3mm.
  • Paper Piercer: A push pin or needle works too.
  • Bone Folder
  • Pencil
  • Ruler
  • Template: Download here at MinieCo Blog
DIRECTIONS

1. Print the envelope on standard white cardstock rather than plain paper. It's much sturdier and allows you to use it as a template. Cut it out. Don't forget the 2 circle pieces! (I label all of my templates so they're easily identifiable in my collection when I need them.)


2. Choose your desired colored or patterned paper and place it [print-side down] on your work area. Using your template and a pencil, trace around the envelope and cut it out. Score each flap with your ruler and bone folder, then fold each side.


3. Using the scrap from the envelope you just cut, or scraps from coordinating patterned or colored paper, trace and cut the 2 small circles. For extra sturdiness, I usually double these, cutting 4 discs and gluing them back to back.


4. Poke the two holes in your envelope and a hole in the center of each circle (marked on the template). Attach both discs to your envelope using the mini brads.


5. Fold the sides and bottom flaps and secure with glue. 
Tip: I use small craft clamps along the areas I glue to be sure that I get a nice and secure bond.


6. Using about a 10" length of string, tie one end to the disc on the top flap and secure it with a double knot. Trim the excess string under the disc. Wrap the remaining string around both circles to close your envelope. Tie a knot at the end to keep the string from unraveling.


This project is so simple and can be easily customized to fit any theme, mood, or occasion. I love using them to hold precious ephemera or small treasures or trinkets in my smashbook. I've also added them to some of my handmade daybooks. You can find more info about my daybooks in this post, or in the tab at the top of my blog titled Daybooks. My most favorite thing to do with these envelopes is including them in my Happy Mail swaps! The girls I send them to just love 'em! I even created my own 4x6 template so I could have a larger envelope for my 2012 December Daily album. But they can also hold little cards, plant seeds, or any other small item that needs a special home. Leave them as is or embellish any way you want. 
Have fun with 'em!

Looking for more crafty inspiration? Browse through my blog. I have plenty of other DIY projects. And be sure to check out my "Printables/Templates," "SMASH & PL," and "Crafty Mama" pinboards on Pinterest before you leave. You'll find hundreds of links to DIY's, ideas, inspiration, printables, and templates to satisfy your crafty fix.Wanna stay updated on my recent posts and projects? Be sure to "like" my new fan page on Facebook

I really hope you enjoyed my post and feel motivated and inspired to create something beautiful. Feel free to share it! And please let me know if you have any questions, thoughts or comments. Your feedback is always welcome and much appreciated!

Mahalo for stopping by!

Saturday, June 1, 2013

Project Life: Week 20


Happy Saturday! I hope you're enjoying your weekend. Can you believe that half of the year is already gone?! This is my very first year doing Project Life and I am so proud of myself for sticking with it and not giving up when I fall behind. Flipping through my book and seeing all of our wonderful memories so far is a such a great feeling. I'm definitely going to keep it up. Looking at my album at the end of the year is going to be awesome! 

I'm pretty much caught up with PL for the most part, so today I'm happy to share my next completed layout here with you now... 

WEEK 20
Life Documented
May 12 - May 18

Week 20: Full Spread

This week was incredibly fun to document! We celebrated Mother's Day together, and I took lots of instagram photos capturing our everyday life. I've learned over the years that it's all about the little things, and I loved being able to showcase that in this spread. Like last week, I continued my obsession with neons through embellishments and more bright and cheery journal cards.  I mixed it up a bit this week with a few free printables (one of them I actually created myself), as well as some handmade cards.  Colorful washi tape, cute Cameo cuts, and my favorite alphabet and number stickers adorn these pages.

Week 20: Left Page

This layout is the back of the We R Memory Keepers photo page from Week 19, that I specifically chose to hold the photobooth pic we took this week. It's all about the big journal cards here, both horizontal and vertical 4x6s. The "notebook paper" title card is the backside of a double-sided card from last week by WRMK. I used a #20 from a set of cutouts that came in my Colorbok "Hopscotch" collection paper pad. Some printable cut-outs and cute washi tape hold our fun photo strip in that 2" slot. A perfect fit!

Week 20: Right Page - Close Up

I found an amazing "Motherhood" quote a while back that I'm so happy to finally use here. It couldn't be more perfect! The pink journal card is a free printable that I used to document my Mother's Day. To hold my instapics from that day, I made a 6x4 Kraft card that I cut on my Cameo. I chose a strip of neon orange paper tape that I cut on one end to make a banner, and embellished it with some Glitz "Teeny Alphas" and GCD "Glitter Candy Dots."

I made the last 4x6 card using a snippet of my recent activity on Netflix and printed it to size. I really like adding these types of cards, let them be Netflix snippets, or weather app screenshots; because it's documenting real life during a specific moment in time. So very cool! 

Week 20: Right Page

I went with a Becky Higgins Design A photo page for this side. And I do have to say, that this page has to be my favorite so far. I love everything about it! It's totally me. The 4x6 "Be Happy" journal card is a printable that I designed for my "Neon Love" collection. It works fabulously with all of the free neon journal and filler cards I've downloaded over the last couple of months. The 4x6 "Family Playlist" card is another free printable I found. I thought it was perfect to use for Mother's Day week.

[7/5/13: You can now find my "Happy Cards" freebie here.]

The other two 4x6 cards were made using Amy Tangerine's 6x6 "Sketchbook" paper pad. Just a simple 2" cut off the top or bottom creates the perfect backdrop for pretty personalized cards to hold your precious instagram pics. I added some sweet little Cameo cuts like the pink potty girl and heart speech bubble, along with some washi tape, bling, tiny alphabet stickers, and Dymo labels to finish off those cards.

Week 20: Right Page - Close Up

I had such a great time picking out the 3x4 cards for this layout. I chose a hot pink "This Life Is.." filler card that I got from the "Jump for Joy" Facebook hop. It's my fave! The next card is Kraft cardstock that I cut with my Cameo. It holds a cute instapic of my daughter and is embellished with a strip of October Afternoon Midway washi and more tiny alphabet stickers. The green "Notes" card is from Colorbok's "Hopscotch" Collection. The last 3x4 card is another free printable from the "Jump for Joy" collection that I added a wallet-size photo to of a recent shopping haul. My Dear Lizzy roller date stamp and WRMK acrylic date stamp was used to finish off this page.

I just love the way this spread turned out! It truly represents everything I love about my life.... and it really is the little things that matter most to me. Seeing this page makes me heart smile. I hope you enjoyed reading this post as much as I loved creating the pages that fill it. Until next time...

You can find all of the free printables I talked about in this post on my "SMASH* & PL" pinboard on Pinterest. Aside from printables, it's also full of links to DIYs, ideas, and inspiration for everything SMASH* and Project Life. I also have all of the pages of my PL album here on my blog. Feel free to take a peek!

Are you documenting 2013 with Project Life? What do you like most about it? Any thoughts, questions, or comments about this post? Please drop me a line. Your feedback is always welcome and much appreciated.

Mahalo for stopping by!
Related Posts Plugin for WordPress, Blogger...
Pin It button on image hover